Leather Bracelet Stitch Density: How to Read SPI on a Sample
Stitch density is the one number on a leather bracelet that a buyer can read off a sample in under a minute, and it is also the number most often left off the purchase order. The consequence is predictable: the sample is approved on colour and hardware, the bulk arrives with a visibly coarser stitch, and nobody can prove it changed because no SPI figure was written down. Count it on the sample, put a band around it, and the argument disappears.
What SPI Means and How to Count It on a Curved Band
SPI is stitches per inch, counted along the sewing line rather than along the length of the band. Because a bracelet is short and curved, counting over a full inch is awkward; count over 25 mm, which is close enough to an inch that the difference does not matter at this scale, and count from the centre of one hole to the centre of the last hole in the measured run. Count holes, not thread crossings, or the figure doubles.
Two things distort the count. On a tightly bent band the outer stitch line stretches and reads one SPI lower than the inner line, so measure on the flat section behind the clasp. And the backstitch at the ends sits on top of the run; skip it and start counting after it.
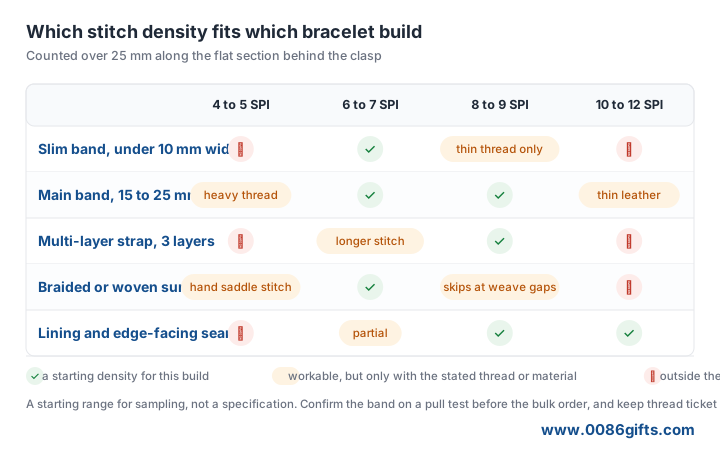
On a leather bracelet the working range is roughly six to nine stitches per inch. Below that the seam looks hand-heavy and the holes are far apart; above it the leather starts to look perforated, which is a durability problem rather than a style one.
Why Density Decides Pull Strength More Than Thread Thickness
Load on a stitched leather seam is carried at the holes, not along the thread between them. More stitches per inch means more load points and a shorter unsupported span of leather between each one, which is why a dense seam with a moderate thread usually outperforms a coarse seam with a heavy thread. Buyers who ask for a thicker thread to fix a weak seam are usually buying a bigger hole and less leather between holes.
That is also where the limit sits. Every stitch is a perforation, and leather tears between perforations when they are too close for the thickness of the material. A two-millimetre bracelet band and a four-millimetre belt do not want the same density, and a supplier who quotes one SPI figure across a whole range is telling you they have not thought about the material thickness.
The third variable is the thread itself. Waxed polyester and waxed cotton at the same nominal size behave differently under tension, and a thread that is too thick for the hole size will sit proud of the surface and abrade. Ask for the thread ticket number and the needle size alongside the SPI figure; the three belong together.
Reading a Sample in Four Measurements
Four numbers turn a bracelet sample into something a factory can hold to.
Density. Count over 25 mm on the flat section behind the clasp, on both the top and the lining seam if the band is lined. Write both figures; they are often one apart.
Edge distance. Measure from the stitch line to the cut edge of the leather. On a two to three millimetre band this is usually between 2.5 and 4 mm. Under 2.5 mm the leather tears out at the first hard pull; over 4 mm on a narrow band the seam looks inset and the edge curls.
Stitch angle and consistency. Look along the seam rather than across it. Saddle stitching should show a slight slant on both faces and a consistent angle from stitch to stitch; a seam where the slant flips mid-run means the awl was re-pierced from the other side, which is a cosmetic defect that shows on a black band under raking light.
Termination. Two or three backstitches at each end, and a thread end that is buried between the layers rather than knotted on the surface. On a bracelet the clasp end takes the repeated pulling, so this is the first place a loose seam appears.
Signs That Look Like Density but Are Not
When a seam fails on a returned sample, density is the usual suspect and usually innocent. Four other causes account for most of it.
Loose tension leaves the thread sitting above the leather instead of pulled into it, so the seam reads correct from a distance and chafes in use. An oversized needle punches a hole larger than the thread, and the stitch then walks in the hole. A skipped stitch at the curve is a machine feed problem and shows as one long span among even ones. Missing backstitch at the clasp end unwinds the whole run from the last stitch rather than from the middle.
Test all four the same way: pull the band gently at both ends while watching the seam, then look at the last five stitches at each end under a light. A seam that opens at the end has a termination problem, one that gaps in the middle has a tension problem, and one that tears the leather has an edge-distance or density problem.
What to Write on the Order

Five lines are enough, and they fit in a single clause.
Density band, not a single figure. Write six to eight stitches per inch over 25 mm, measured on the flat section, and state that a sample outside the band is a rejection rather than a negotiation.
Thread and needle together. Specify the thread material and ticket number, and ask the factory to confirm the needle size it will use. Density is meaningless without them, because a change of thread changes the hole.
Edge distance. Give the range in millimetres for each band width in the order, since a mixed order of slim and wide bands will need two figures.
Termination. State the backstitch count at both ends and require the thread end buried between the layers. This is the cheapest line on the order and the one that decides how a bracelet looks after a month of daily wear.
A retained sample. Keep one sealed sample per density band per colour, and photograph the seam with a ruler in frame. When a reorder arrives, the comparison is a photograph and a count, not a memory of how the first one felt.
See the leather bracelet range we run most often, then send us the band width, layer count and thread you want. We will send back the SPI band we would use for that construction, the edge distance, and a photographed seam with a ruler in frame, so the bulk shipment has something measurable to match.
Sourcing promotional gifts?
Send your item list and quantity for a quote and a digital proof.
Get a free quote


